Weld for those who need to maintain welds
Getting the weld command line tool
Getting weld needs git. If you don’t have git on your system, and you’re on a Debian based system (Debian, Ubuntu, Linux Mint, etc.), then you can do:
$ sudo apt-get install git gitk
(the gitk program is an invaluable UI for looking at the state of git
checkouts - it’s always worth checking it out as well as git itself).
Then decide where to put weld. I have a sw directory for useful software
checkouts, so I would do:
$ cd sw
$ git clone https://code.google.com/p/weld/
which creates me a directory ~/sw/weld.
Note
Sometimes (luckily not often) the Google code repositories give errors. In this case, the only real solution is to try again later.
To use weld, you can then either:
just type
~/sw/weld/weld- this is the simplest thing to do, but the longest to type.add an alias to your
.bashrcor equivalent:alias weld="${HOME}/sw/weld/weld"
add
~/sw/weldto your PATH:export PATH=${PATH}:${HOME}/sw/weld
add a link - for instance, if you have
~/binon your path, do:$ cd ~/bin $ ln -s ~/sw/weld/weld .
Personally, I use the second option, but all are sensible.
You should now be able to do:
$ weld help
and get meaningful output.
Creating a weld
We start with two external packages, project124 and igniting_duck. Here are their remote repositories:
We can clone them in the normal manner:
$ git clone file://<repo_base>/project124
$ git clone file://<repo_base>/igniting_duck
which gives us two working directories:
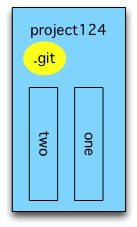
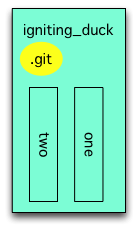
Each has directories called one and two, and naturally each has its own
.git directory.
To create a new weld, we must first write an XML file describing it.
For instance, we might create a file called frank.xml containing the
following:
<?xml version="1.0" ?>
<weld name="frank">
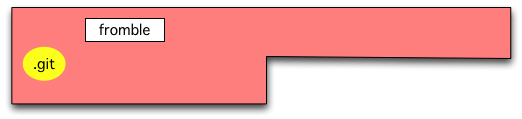
<origin uri="file://<repo_base>/fromble" />
<base name="project124" uri="file://<repo_base>/project124"/>
<seam base="project124" dest="124" />
<base name="igniting_duck" uri="file://<repo_base>/igniting_duck" />
<seam base="igniting_duck" source="one" dest="one_duck" />
<seam base="igniting_duck" source="two" dest="two_duck" />
</weld>
This says that:
The name of the weld is
frankThe remote repository for the weld is (will be)
file://<repo_base>/frombleThe weld will contain two bases:
The first base is called
project124, and its remote repository isfile://<repo_base>/project124- in other words, it’s the first of the two repositories we have already been introduced to at the start of this chapter.Note that the name we give the base does not have to match the repository name (although it probably normally will).
The second base is called
igniting_duck, and it is the second remote repository from above.
The
project124base will provide a single seam in the weld. The source directory is not specified, so this will be the entire content of the base. The seam will be put into the weld as directory124The
igniting_duckbase will provide two seams in the weld. The base directory calledonewill be stored in the weld asone-duck, and the base directory calledtwowill be stored in the weld astwo-duck. Any other directories in the base will not be added to the weld.
Note
Why use XML?
We did consider using Python, but felt that given the highly declarative nature of the information described, the number of opportunities for self-mutilation was just too high.
And because all the best shell scripts parse XML, we chose that.
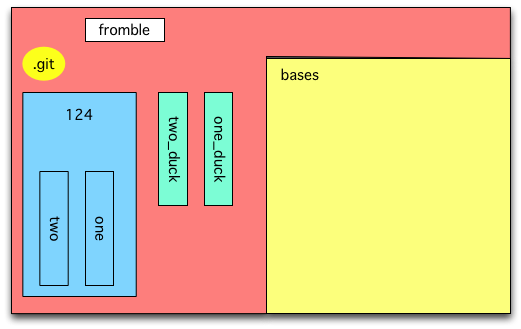
Once we’ve got the XML file, we can use weld init:
$ mkdir fromble
$ cd fromble
$ weld init ../frank.xml
> git init
> git add fromble/.weld/welded.xml .gitignore
> git remote rm origin
> git remote add origin file://<repo_base>/fromble
> git commit --allow-empty --file /tmp/weldcommitYp7JZ2
Weld initialised OK.
to create an empty weld:
The weld contains:
fromble/
  .git/...
  .gitignore
  .weld/
    welded.xml
(I’ve left out the content of the .git directory).
The .gitignore instructs git to ignore some artefacts that weld knows it will
create in the .weld directory.
The .weld/welded.xml is a “copy” of the original frank.xml (actually,
it is produced by reading the original XML and then writing it out from the
internal datastructure, so the layout is likely to be slightly different, and
any comments will be lost, but the content should have the same effect).
Both have been committed to the weld’s git repository.
To populate our weld, we need to use:
$ weld pull _all
This clones the two remote repositories into the weld’s .weld/builds
directory:
.weld/bases/project124
.weld/bases/igniting-duck
then copies the content of those clones into the appropriate places in the weld, and commits the new weld contents. This gives us:
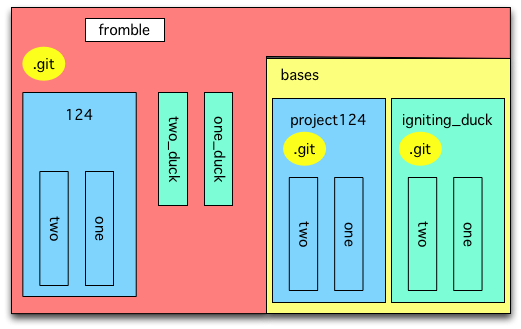
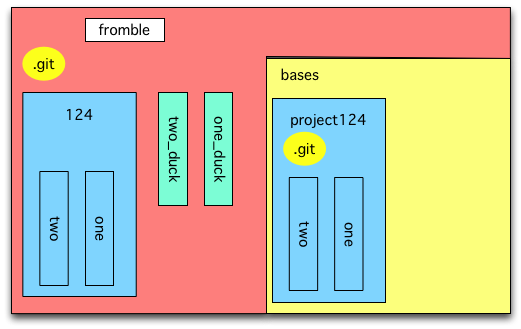
Our directory structure now looks like:
fromble/
  .git/...
  .gitignore
  .weld/
    bases/
      igniting_duck/
        .git/...
        one/
          <source-code ign-1>
        two/
          <source-code ign-2>
      project124/
        .git/...
        one/
          <source-code 124-1>
        two/
          <source-code 124-2>
    counter
    welded.xml
  124/
    one/
      <source-code 124-1>
    two/
      <source-code 124-2>
  one-duck/
    <source-code ign-1>
  two-duck/
    <source-code ign-2>
Here we can see that in .weld/bases are the clones of the two remote
packages (our “bases”), each with its own .git directory. A normal user
will never interact with these, and strictly speaking they are not part of the
weld.
We can also see, at the top level of fromble, that we now have three
source directories: 124, one-duck and two-duck. These are checked
into the weld’s git repository, and correspond to the seams described in the
XML file. Thus the weld source directory 124 corresponds to all of the
project124 base, whilst the two directories in the igniting_duck base
have been split into separate (in this case top-level) directories in the
weld, just as the XML file described.
Now we’ve got our weld set up, we can create a bare repository for it in the normal manner - in this case:
$ pushd <repo-base>
$ mkdir fromble
$ cd fromble
$ git init --bare
$ popd
and push to it (weld init set up the URI in the XML file as the origin
remote, so this “should just work”):
$ git push master origin
so we now have three remote repositories:
Using the weld just needs git
Another user can now clone the weld directly:
$ cd ~/work
$ git clone file://<repo_base>/fromble
which gives them the weld with its seams:
This new weld has the following directory structure:
fromble/
  .git/...
  .gitignore
  .weld/
    counter
    welded.xml
  124/
    one/
      <source-code 124-1>
    two/
      <source-code 124-2>
  one-duck/
    <source-code ign-1>
  two-duck/
    <source-code ign-2>
Note
In normal use of a weld, there is no .weld/bases directory.
The bases are not part of the weld itself, they will only be retrieved if
the user runs a weld command that needs them.
The user can work on the content of the weld as they need, pushing to and pulling from the weld’s remote repository with git in the normal manner.
Using weld commands on the weld may pull bases
The weld command line tool will download (clone or update) the bases when
it needs to. For instance, some queries need access to the base. In particular:
$ weld query base project124
will clone project124 into .weld/bases/, giving us:
or:
fromble/
  .git/...
  .gitignore
  .weld/
    bases/
      project124/
        .git/...
        one/
          <source-code 124-1'>
        two/
          <source-code 124-2'>
    counter
    welded.xml
  124/
    one/
      <source-code 124-1>
    two/
      <source-code 124-2>
  one-duck/
    <source-code ign-1>
  two-duck/
    <source-code ign-2>
Note that the source code in the project124 base may be different than
that in the corresponding seams (shown here as <source-code 124-1'> versus
<source-code 124>) - which is exactly what the query needs to know.
If we decided to update the weld with any changes made in the remote igniting_duck repository:
$ weld pull igniting_duck
then this would also necessitate pulling the base:
In this case, the source code in the weld would be updated to match that in the igniting_duck base:
fromble/
  .git/...
  .gitignore
  .weld/
    bases/
      igniting_duck/
        .git/...
        one/
          <source-code ign-1'>
        two/
          <source-code ign-2'>
      project124/
        .git/...
        one/
          <source-code 124-1'>
        two/
          <source-code 124-2'>
    counter
    welded.xml
  124/
    one/
      <source-code 124-1>
    two/
      <source-code 124-2>
  one-duck/
    <source-code ign-1'>
  two-duck/
    <source-code ign-2'>
Adding a base
Briefly:
- Make sure that the base to be added already exists as a remote git repository.
- In the weld, do a
git pullto make sure that the weld is up-to-date.
Edit the
.weld/welded.xmlfile to add the base (including its repository URI) and the seam(s) you want from that base.Commit the XML file with
git commit .weld/welded.xmland an appropriate message.Run
weld pull <new-base-name>to pull the base.This will:
- Clone the base repository into
.weld/bases/<new-base-name>. - Copy the code for the seam(s) selected into the weld.
- Commit the results.
- Clone the base repository into
Once you are happy that the base and seam(s) are integrated properly into the weld, then use
git pushto push the weld to its remote repository.
Changing a base or seam
At the moment, altering the content of the weld, as described by the XML file, needs some care.
For instance, if we edited the XML file to change name of the seam
one_duck to one_goose:
<?xml version="1.0" ?>
<weld name="frank">
  <origin uri="file://<repo_base>/fromble" />
  <base name="project124" uri="file://<repo_base>/project124"/>
    <seam base="project124" dest="124" />
  <base name="igniting_duck" uri="file://<repo_base>/igniting_duck" />
    <seam base="igniting_duck" source="one" dest="one_goose" />
    <seam base="igniting_duck" source="two" dest="two_duck" />
</weld>
and did:
$ git mv one_duck one_goose
(one day, weld may provide a command to do those together for you) then we would have:

and because we have done both of those things, weld pull, weld push
and all the other weld commands would recognise that the base directory
igniting_duck/one is now related to the weld seam one_goose.
Things to remember not to do in a world of welds
Do not use git submodules in bases, as weld will not preserve them.
Do not use commit messages that start “X-WeldState:”, as weld uses such for its own purposes.
Do not use branches that start “weld-”, as weld uses such for its own purposes (and is not very careful in checking if you’re on an offending branch, it just looks to see if the name starts with “weld-”).
Do not change the name of the origin remote of a weld, as the weld command
assumes that origin is the origin remote it should use.